前回、WordPress のプロフィール情報を表示する方法紹介しました。今回は、WordPress のプロフィール情報に独自の項目を追加して表示させてみたいとおもいます。
スクリーンショット

プロフィールに項目を追加する
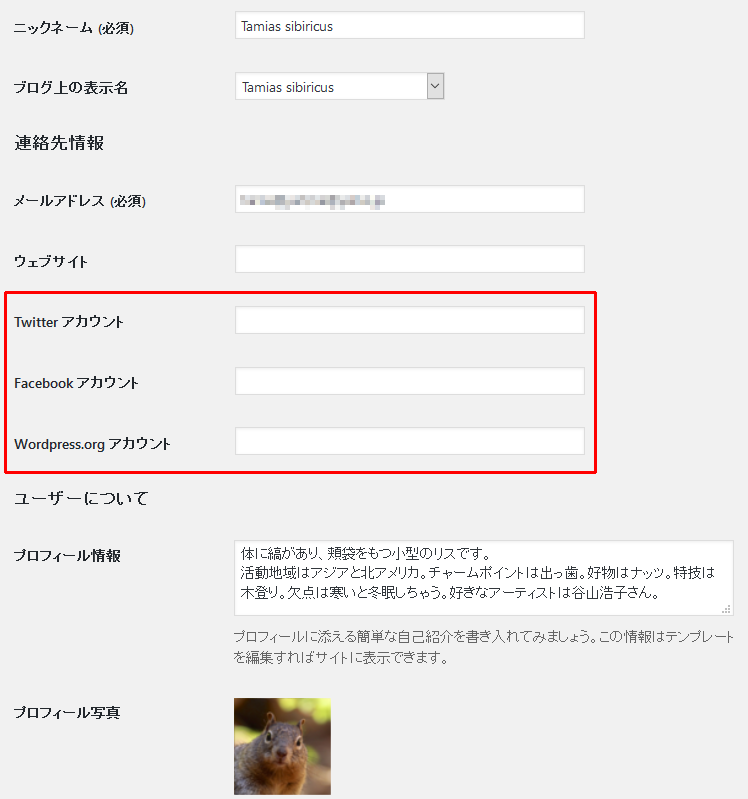
プロフィールに追加する項目は、各 SNS へのリンクをアイコンで表示させるために、『Twitter アカウント』、『Facebook アカウント』および『Wordpress.org アカウント』としました。
追加するには、user_contactmethods フィルターフックを使用します。
コード
function my_user_contact_methods( $user_contact ) {
	$user_contact['twitter'] = 'Twitter アカウント';
	$user_contact['facebook'] = 'Facebook アカウント';
	$user_contact['wordpress'] = 'Wordpress.org アカウント';
	return $user_contact;
}
add_filter( 'user_contactmethods', 'my_user_contact_methods' );
上記コードを追加(functions.php 等)すると、下記のように管理画面のプロフィールに項目が追加されます。

追加した項目の表示方法
追加した項目は、get_the_author_meta 関数や get_userdata 関数等で取得できます。
例)
<?php echo get_the_author_meta( 'twitter', ); ?>
や
<?php the_author_meta( 'twitter', ); ?>
Dashicons アイコン フォントを組み込むコード
サンプル コードでは、SNS へのリンクをアイコンで表示させるために、WordPress(3.8 以降)に標準で組み込まれている Dashicons アイコン フォントを使用します。
functions.php 等
function my_enqueue_scripts() {
	wp_enqueue_style( 'dashicons' );
}
add_action( 'wp_enqueue_scripts', 'my_enqueue_scripts' );
プロフィールを表示するサンプル コード
functions.php 等
/**
 * プロフィールの内容を取得します。
 *
 * @param int $avatar_image_size アバター画像の幅と高さ。デフォルト 96。
 * @return string プロフィールの HTML。
 */
function my_get_the_post_profile( $avatar_image_size = 96 ) {
	$description = get_the_author_meta( 'description' );

	if ( !$description )
		return '';

	$avatar = get_avatar( get_the_author_meta( 'user_email' ), $avatar_image_size );
	$name = get_the_author_meta( 'display_name' );

	$twitter = get_the_author_meta( 'twitter' );
	$facebook = get_the_author_meta( 'facebook' );
	$wordpress = get_the_author_meta( 'wordpress' );

	$html =
		'<div class="author-profile content-bottom-widgets">' .
			'<div class="author-profile-avatar">' . $avatar . '</div>' .
			'<div class="author-profile-description">' .
				'<h2 class="author-profile-name">' . esc_html( $name ) . '</h2>' .
				'<p class="author-profile-bio">' . nl2br( $description ) . '</p>'  .
				'<div class="author-profile-sns">' .
					( empty( $twitter ) ? '' : '<a href="https://twitter.com/' . $twitter .'" title="twitter"><span class="dashicons dashicons-twitter"></span></a>' ) .
					( empty( $facebook ) ? '' : '<a href="https://facebook.com/' . $facebook .'" title="facebook"><span class="dashicons dashicons-facebook"></span></a>' ) .
					( empty( $wordpress ) ? '' : '<a href="https://profiles.wordpress.org/' . $wordpress . '" title="wordpress"><span class="dashicons dashicons-wordpress"></span></a>' ) .
				'</div>' .
			'</div>' .
		'</div>';

	return $html. "\n";
}
テンプレート(single.php や archive.php 等)
<?php echo my_get_the_post_profile(); ?>
CSS コード
.author-profile {
	clear: both;
	padding: 15px;
	border: solid 1px #d1d1d1;
	border-radius: 3px 0 0 3px;
}
.author-profile .author-profile-avatar {
	float: left;
	width: 120px;
}
.author-profile .author-profile-avatar img {
	float: left;
	border-radius: 50%;
}
.author-profile-description {
	overflow: hidden;
}
.author-profile .author-profile-name {
	clear: none;
	font-size: 1rem;
	font-weight: bold;
	line-height: 1.75;
	margin: 0;
}
.author-profile .author-profile-bio {
	font-size: 0.8125rem;
	color: #686868;
	margin: 0.5rem 0;
}
.author-profile .author-profile-sns span {
	color: #21759B;
	margin: 0 0.65rem 0 0;
	font-size: 1.65rem;
}
.author-profile .author-profile-sns span:hover {
	color: #686868;
}
最後に
わずかなコードで簡単にプロフィールの項目を追加できプロフィール情報を充実させることができるので、是非お試しください。
